Frequently Asked Questions
We have created FAQs based on questions from our users. Please take a look.
Learn more about tabiori
Ask the AI you already use whether tabiori suits your trip. Your question is ready with a single click.
Opens a new tab with your question and tabiori's official information already included.
About Itineraries
1
I want to edit an itinerary from my PC
If you access tabiori’s official homepage (https://tabiori.com/) from a PC browser, a login button will be displayed.
Click it to log in and you will be able to edit your itinerary.
Supported OS: Windows, macOS, Linux. Please use the latest versions of major browsers (Microsoft Edge, Google Chrome, Apple Safari, Mozilla Firefox, etc.).
2
What is itinerary sharing?
tabiori is a travel-itinerary app that allows multiple people to collaborate.
When you first create an itinerary, only the creator can view and edit it, but by inviting members via QR code or URL, you can co-edit with family or friends.
3
How do I invite friends to an itinerary?
On the “Information” tab of the itinerary you want to invite friends to, tap the “Invite” button at the bottom right to issue an invite URL or QR code.
You can also invite them from the itinerary list by tapping “︙” at the top right of the itinerary and choosing “Invite to itinerary”.
4
Which items inside an itinerary are shared?
All members in an itinerary can view and edit Schedules and Scraps.
For Notes and Checklists, only items marked as shared are visible to everyone.
5
Will my itinerary be made public without my permission?
Itineraries in tabiori are shared only with invited members, so users outside the group cannot view them without permission.
6
I want to keep an itinerary private
Itineraries start as private. Only invited members can view or edit them.
If you want to remove an already invited member, open “Members” at the bottom of the “Itinerary Info” tab, or use the same option from the itinerary’s menu in the list view.
7
I want to add information about places I’d like to visit
On the schedule create/edit screen, search from “Search for a place (optional)” below the title to add a shop or place’s location, address, phone number, and reference URL.
If you choose a spot registered in tabiori, you can check its photos, description, and opening hours, and show its name and address in the local language.
For details, see the how-to page (https://tabiori.com/howto/schedule/).
8
My trip dates (departure and return) aren’t decided yet
You can create an itinerary with the departure and return dates left as “TBD”.
Once your dates are decided, set them from “Edit” at the bottom right of the “Information” tab.
9
If I change the departure date, what happens to my schedule dates?
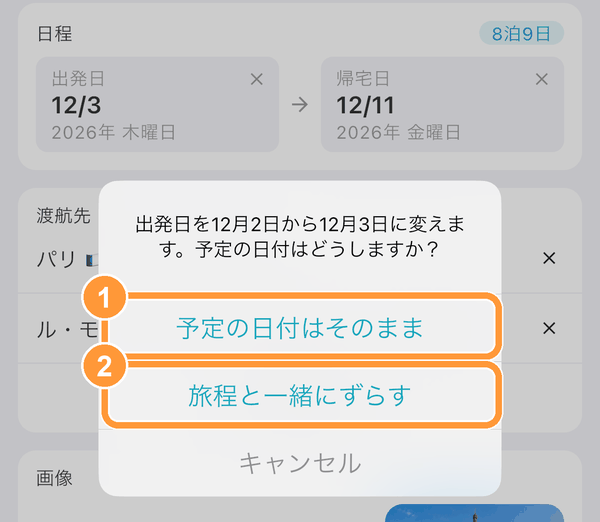
When you change the departure date of an itinerary that has schedules, you’ll be asked what to do with the schedule dates.
Choose “Keep schedule dates” to keep schedules on the same calendar dates, or choose “Move with the trip” to shift the schedule dates by the same number of days as the departure date.
The return date doesn’t change automatically, so change it if needed.
10
The date or time of a schedule isn’t decided yet
Schedules without a time appear at the top of that day as “All day”.
Schedules with the date set to “TBD” appear under “Other schedule” in the schedule list.
11
Does tabiori handle time differences for trips abroad?
Yes. You can set a time zone for each schedule, and when you choose a place, the time zone for that place is selected automatically. If there’s a time difference from where you live, the time where you live is also shown.
For travel such as flights, you can set separate time zones for the departure and the arrival.
12
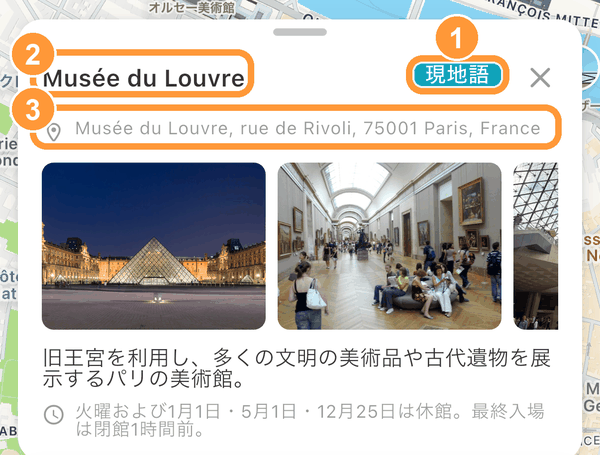
I want to show a spot’s name and address in the local language
On the detail screen of a schedule with a spot, scroll down and tap “Local language” in the spot information to show the name and address in the local language. Tap it again to switch back.
You can copy the name and address by long-pressing them.
13
I want to copy a schedule to another itinerary
On the detail screen of the schedule you want to copy, tap “Copy” at the top right. You can also long-press the schedule in the schedule list and choose “Copy”.
Open the schedule list of the itinerary you’re copying to. “Copied schedule” appears at the top. Tap “Paste” to open the “Create schedule” screen with the details filled in, check the date and time, and tap “Create”.
For details, see the how-to page (https://tabiori.com/howto/schedule/).
14
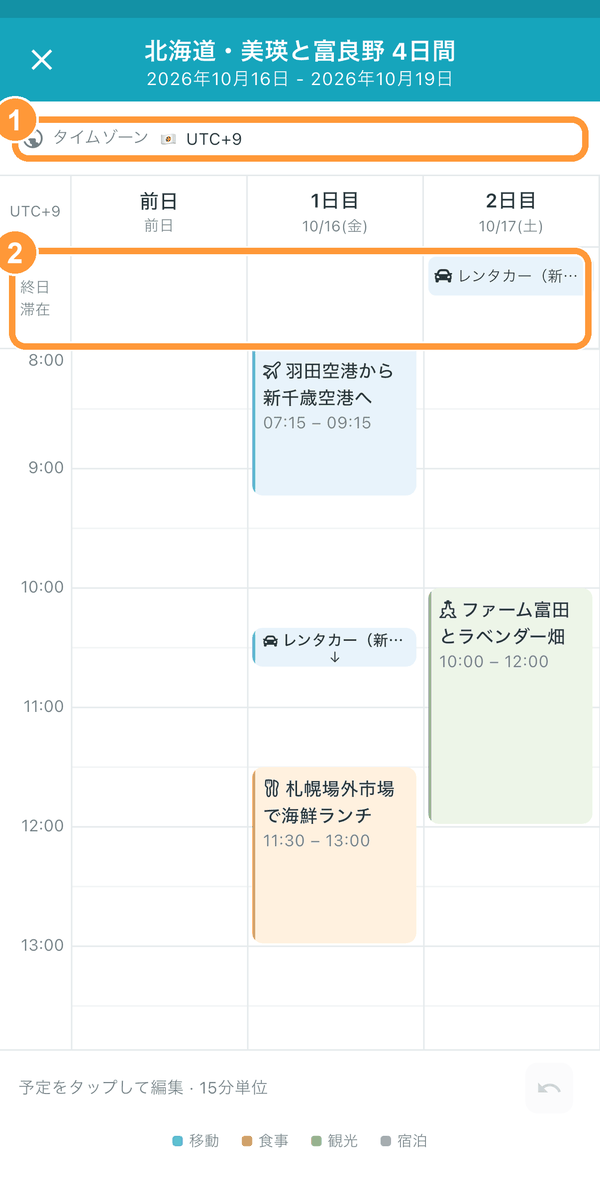
I want to see my schedules in a timetable view
At the very top of the schedule list, pull the screen down, and when “Release to show timetable” appears, lift your finger to open the timetable, with dates across and times down.
You can drag a schedule to move its date and time, or long-press an empty time slot to create a schedule. Your changes are saved when you choose “Save” as you close the timetable.
For details, see the how-to page (https://tabiori.com/howto/schedule/).
15
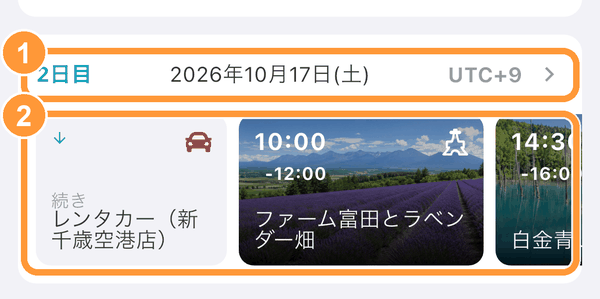
My schedule list is long and hard to read
Tap a date heading to collapse that day’s schedules and line them up as wide cards. Tap it again to expand them.
The collapsed state is saved on this device and doesn’t affect what other members see.
16
For a family trip, I want a shared packing list for everyone
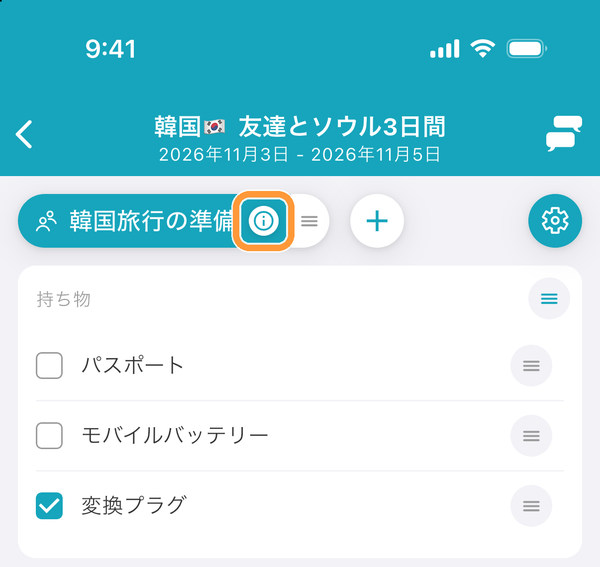
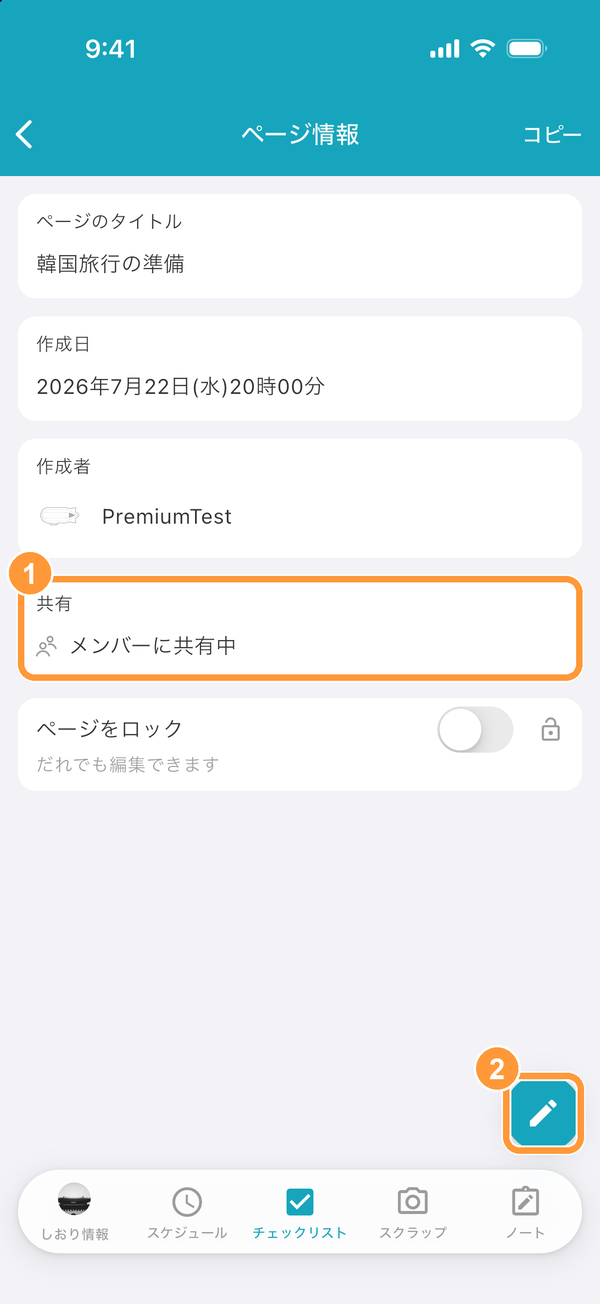
Tap the ⓘ button on the tab of the page you want to share to open “Page information”. You can check the current setting under “Share”.
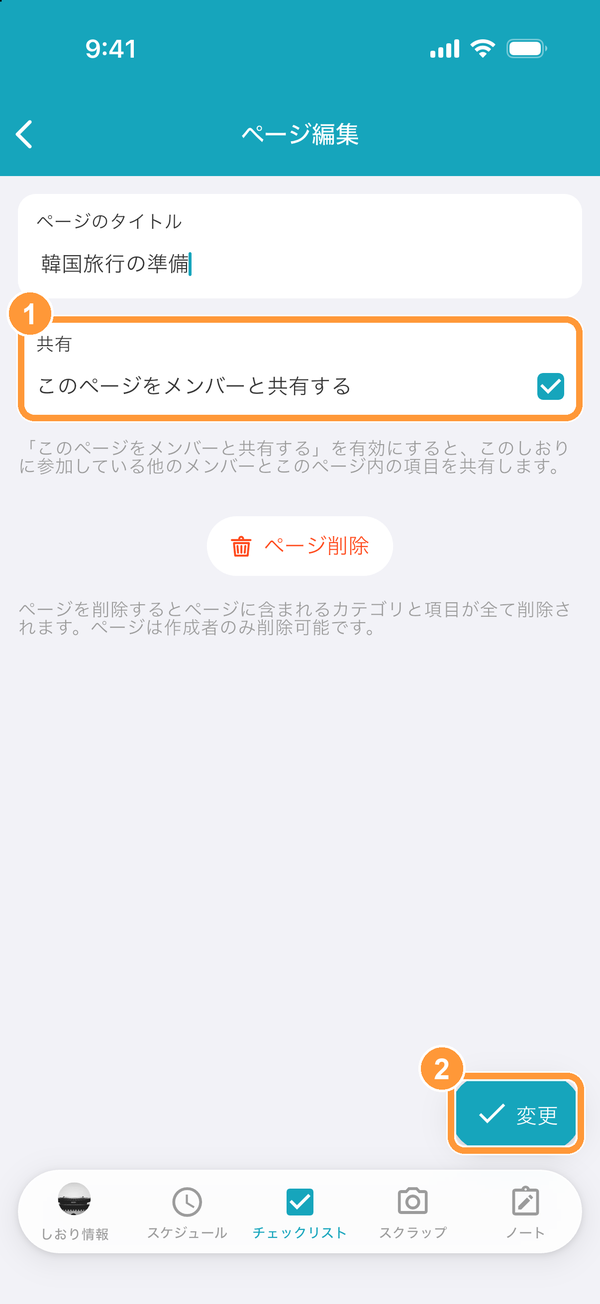
Tap the pencil button at the bottom right to open “Edit pages”, turn on “Share with members” and tap “Change”. The page will then also appear in other members’ checklists. You can also choose this when adding a page.
To keep a checklist visible only to you, turn sharing off.
17
Can I copy a checklist from another itinerary?
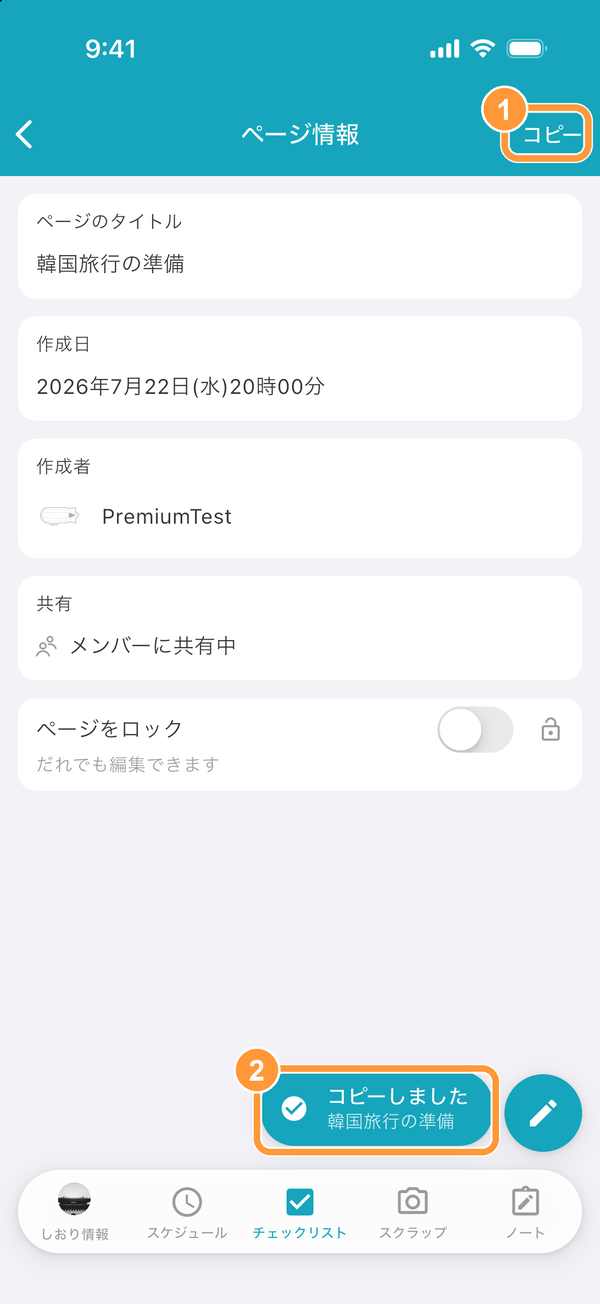
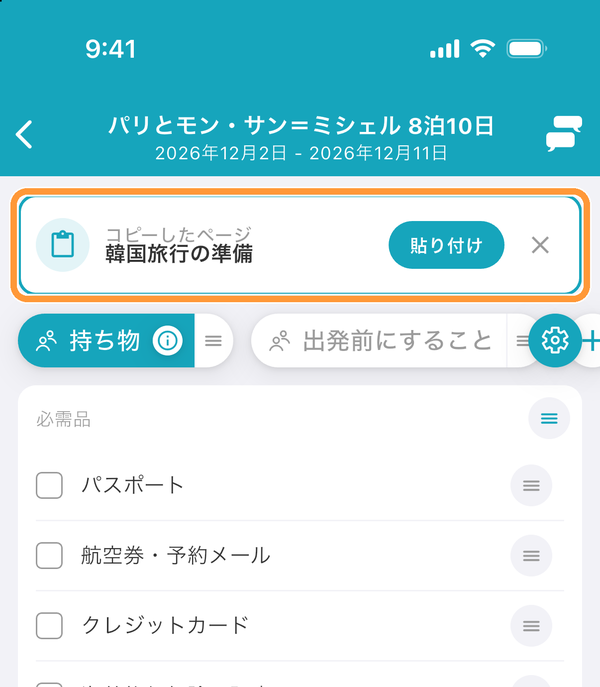
Tap the ⓘ button on the tab of the page you want to copy to open “Page information”, then tap “Copy” at the top right.
Open the Checklist screen of the itinerary you’re copying to. “Copied page” appears at the top. Tap “Paste” to add the page together with its checklist.
18
How do I reorder checklist categories?
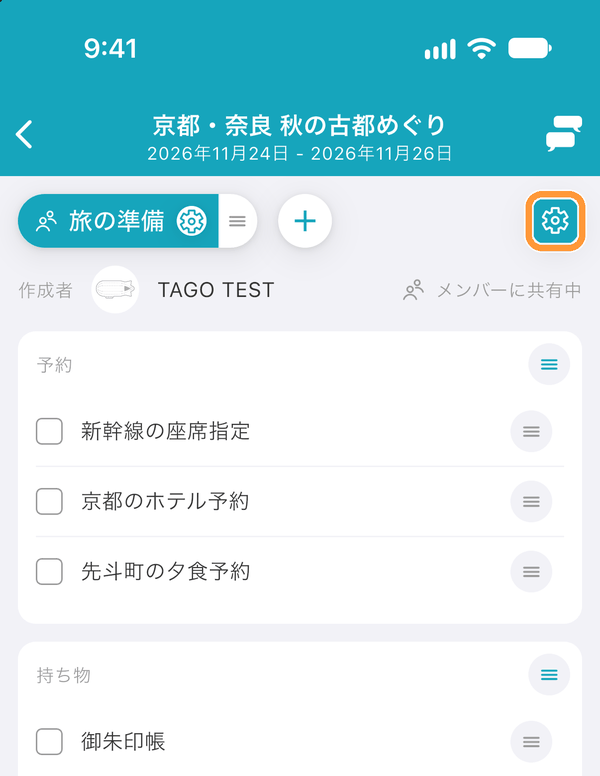
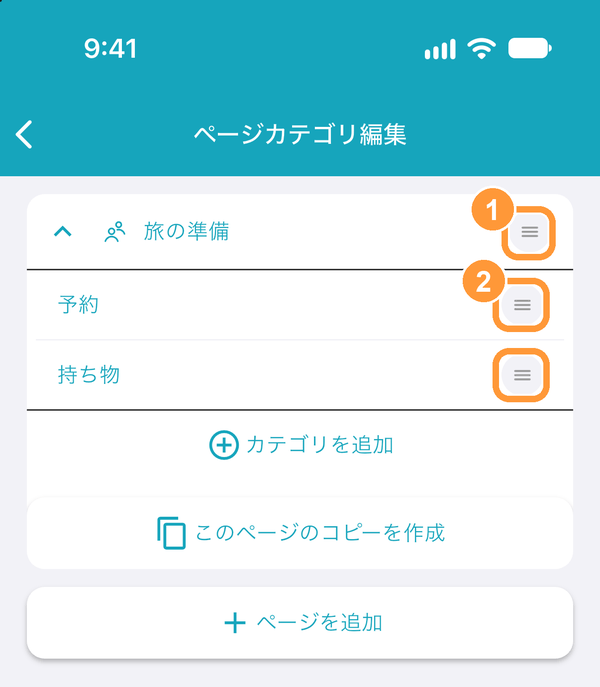
Tap the gear button at the top right of the Checklist screen to go to the “Edit pages & categories” screen.
Tap the arrow to the left of a page’s name to show its category list, then drag the button at the right end of each category to reorder them.
19
I want to know the total travel cost
Costs entered in the Schedule are automatically totaled.
You can check the total amount from the “Itinerary Info” tab. Multiple currencies are supported.
20
Can I use it offline?
tabiori lets you view itineraries offline (airplane mode).
It shows the data last displayed while online, so before boarding a plane or going somewhere with no signal, open tabiori and load the itinerary once.
While offline, “Offline” is shown on the screen, and you can’t create or edit itineraries, schedules, or other content.
21
I want to change the itinerary cover image
Tap “Edit” at the bottom of the “Itinerary Info” tab to open the itinerary-info editor, where you can change the cover image.
22
Is it free to use?
tabiori is currently free for basic use.
We also offer a Premium membership with additional features.
23
I’m worried about security
tabiori protects user data with modern security measures and cloud infrastructure.
24
I want to print my itinerary
Itineraries created in tabiori can be printed easily at convenience stores. On the app, see “Print itinerary” under the “Itinerary Info” tab.
Premium members can also print at home from a PC.
To print at home, log in with the latest browser, select your itinerary, open the details, and click the print button. This feature is optimized for the latest Google Chrome.
25
I want to print at a convenience store
With one tap, tabiori lets you print an itinerary at a convenience store.
¥299 (tax included) * Printing at the store costs extra.
The User Number is valid for 5 days from issue.
26
What are the steps for convenience-store printing?
Please print the desired number of copies after entering the user number on the multifunction copier at a participating Lawson, FamilyMart, or Poplar Group store in Japan.
If there is a large amount of data, the print job may be split into multiple files. Use the same User Number to print every file at the store.
27
What does “additional copy fee” mean for itinerary printing?
The store printing fee varies by paper type and number of pages.
¥299 (tax included) * Printing at the store costs extra.
28
I want to print at home
Itineraries can also be printed at home. In the app, see “Print itinerary” under the “Itinerary Info” tab.
This feature is available only to tabiori Premium members.
Log in with the latest browser, select the itinerary, open the details, and click the print button. Optimized for the latest Google Chrome.
29
My invite code might have leaked
If an invite code (URL or QR code) leaks, uninvited users might join the itinerary.
Go to the itinerary details and reset the invite code. All previously issued codes will be invalidated.
30
I lost the convenience-store print User Number (code)
In the app, tap the notification bell (🔔) at the top right.
In the browser, open the itinerary details and choose Convenience-store printing.
31
Will I get notifications if someone edits the itinerary?
Yes. When a member edits Schedules or Scraps, other members receive a notification.
32
I’m not receiving notifications
If you don’t receive notifications, please check your device’s notification settings and the app’s notification settings.
33
My data disappeared
Data created by itinerary members is deleted when a member leaves or deletes their tabiori account. Many inquiries are due to logging in with a different account. Please log in with the account (login method) that created the itinerary.
34
How do I see the map in the Schedule?
In the app, open a schedule with a place added and a map appears at the top of the screen. Swipe down to make the map larger and see lines connecting it to the schedules before and after.
If you use tabiori in a browser, open the schedule details to see the map.
35
I want to delete an itinerary
In the itinerary details, tap “Edit” → “Delete itinerary.”
36
Are there any limits on image uploads?
Each itinerary has a file storage limit (the total of photos, videos, PDFs and other files saved in Schedule, Notes, Chat and Scrapbook): up to 100 MB for a free itinerary and up to 10 GB for a Premium itinerary.
37
Can I reorder my itineraries?
The itinerary list is displayed in order of departure date and cannot be reordered. Premium users can hide specific itineraries from the list. Note that checklist items can be freely rearranged.
About Accounts
38
I want to create a tabiori account
On tabiori.com, you can create an account using email and password, Apple, or Google.
39
I want to log in to tabiori
On tabiori.com, you can log in with email and password, Apple, or Google.
40
I want to transfer my itineraries to another smartphone
When you change devices, simply log in to tabiori on the new device to view and edit the same data.
41
What does account linking mean?
By linking your tabiori account with an email address or social media account, your itineraries are saved to the cloud.
Choose which services to link from Profile settings.
42
If I link a social media account, will tabiori post automatically?
No. Even if you use social-media login, tabiori will not post or send direct messages without your permission.
43
I want to delete my account
From the “My Page” tab, open Profile settings and delete your account.
When your account is deleted, you will be withdrawn from tabiori.
All data created or used in tabiori will be deleted, and a deleted account cannot be restored.
44
Is the service ending?
No. We once announced the end of the service, but thanks to tremendous support we relaunched after a renewal. We sincerely appreciate everyone's help.
AI Integration
45
How do I use tabiori from ChatGPT?
Install "tabiori" from ChatGPT's app directory, sign in with your tabiori account, and allow the connection.
For detailed steps, see https://tabiori.com/howto/ai/
46
What can I do with AI integration?
You can create itineraries and add or edit schedules, checklists, and notes from your conversation.
We especially recommend pasting booking confirmation emails, PDFs, or screenshots and letting AI register the details to your schedule.
47
Does AI integration cost anything?
There is no charge on the tabiori side.
Please check each AI service (such as ChatGPT) for its own plans and terms.
48
How do I disconnect the AI integration?
Remove the tabiori connector from ChatGPT's settings.
After disconnecting, AI can no longer access your itineraries.
49
I'm worried AI might change my itinerary without permission
AI can only change your itineraries when you, the user who allowed the connection, ask it to.
Note that requested changes are applied immediately without confirmation and are visible to itinerary members right away. You can disconnect the integration at any time.
50
Which itineraries can AI see?
Only the itineraries that the signed-in user is a member of.
AI cannot access itineraries you have not joined or those of other users.
Other
51
The app says it could not be recognized as an official app
This message appears on Android when tabiori cannot confirm that the app was installed from Google Play. Reinstall tabiori from Google Play and make sure it is up to date. If the problem remains, open Google Play Store settings, tap “Play Store version” five times to enable Developer options, then run the “Check integrity” action under Play Integrity. Send the displayed result through the contact form (https://tabiori.com/contact).